Sunday, December 29, 2013

Mad About Pink discount giveaway - try your luck and participate - ends 7 Jan


Hello/Ciao,

as a present to all my friends and customers I've created a free lottery where you can win a 10% off - 5% off or a free shipping on your next order.
Per finire in festa il nuovo anno, ho creato questa piccola lotteria per gli amici e acquirenti dove è possibile vincere 5 % - 10% di sconto o spedizione gratuita su tutto.

To enter it's easy, you must be my blog follower or you must have purchased from me in 2013 or like me on my FB page. If you are all 3 then let me know and you can triple your chances.
Per partecipare è semplice, devi o seguire il mio blog, o aver acquistato da me nel 2013 or aver cliccato Mi Piace la mia pagina su Facebook. Se hai fatto tutti e 3 allora ha 3 volte più di possibilità.

If you'd like to participate, just comment this post or write me an email or write a convo on my Etsy...anything you prefer and I'll make a list of all your entries. On the 7th of January, my sons will pick the lucky winners.The coupon is for personal use or it can be given to a friend.
Se volete partecipare o semplicemente regalare il buono a qualcuno che conoscete, lasciate un commento, o scrivetemi una mail personale o su etsy o Fb e vi conto. Il 7 gennaio, i miei bambini pescheranno i vincitori.

Good luck!
Buona fortuna!
Jess

Tweet this post! Visit the Mad About Pink Shop Now!

Friday, December 27, 2013

How to reuse your wrapping paper leftovers... recycling is good

Because I love recycling, here some ideas on how to use your wrapping paper from Christmas presents.


Create a Party BannerCreate a party banner!

Dress up your Office supplies
Make bookmarks!
Create color coded labels!
Use it as frame background!

Cover your Books!
Make Napkin rings!
Recycle Gift Wrap via homework (8)Use a hole punch to create many decorations for your packages!

This is just a little list of ideas....but enough to make you think about how easy it can be to use leftovers.
Have a great day!
Jess
Tweet this post! Visit the Mad About Pink Shop Now!

Monday, December 23, 2013

Merry Christmas and Happy 2014 + free printable gift tags


My dear readers and friends,

I wish you all a Merry Christmas and an excellent 2014.

What do I wish for next year? 
winter home decor,design #KBHome
More love around me! If we all try, we'll make it happen!
And to thank you for this year, a little freebie for you:
3 design for you to use. Just open a word document and copy those images below and re-size as you please and place as many as you can in a page...come on, save those trees.


Tweet this post! Visit the Mad About Pink Shop Now!

Saturday, December 21, 2013

Gingerbread House and Royal Icing recipe


Hello everyone,
Christmas is almost here and today I got given my first present by a special Santa's helper. I got one of those kit from Ikea to make a gingerbread house.
So I decided to share some ideas and at the bottom an easy Royal Icing recipe.

ginger bread house gingerbread house 2009

Images via Sweetopia.com

Royal Icing recipe


Tweet this post! Visit the Mad About Pink Shop Now!

Saturday, November 30, 2013

Jar Snow Globe - Easy 10 mins DIY tutorial


Here's a quick idea to make with your loved ones! Transform it into a center piece or a decoration. And no need to spend money. I'm sure you'll have some little items to add (toys, baby food jars, old xmas decoration, glitters sitting around the house)
If you make one, please send me a photo and I'll be happy to post it.
I Loooooove Christmas time!


All you need to create your own are jars in assorted sizes, waterproof superglue, trinkets, glycerin (available at crafts stores) but not necessary, you can use water ...Mad About Pink way of doing things :-), and glitter.

Instructions

1.Use glue to adhere your trinket to the inside of the jar lid. Dry about 24 hours.

2.Fill jar with enough water to fully submerge the trinket. Add three to five drops of glycerin and desired amount of glitter.

3.Use glue to adhere lid to the jar's metal screw band. Let dry.

4.Apply glue to the lid's inner edge, and screw onto jar. Let dry completely before shaking.

Have a good week end,

Jess
Tweet this post! Visit the Mad About Pink Shop Now!

Sunday, October 13, 2013

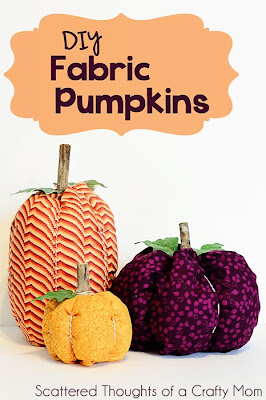
Fabric Pumpkins tutorial for your home


How to make Fabric Pumpkins!
full tutorial can be found here

Materials:
  • Fabric
  • Pillow stuffing
  • needle and thread
  • hot glue
  • scissors/ruler
  • Something for the stem and leaves 
  • Twine, string or yarn to wrap around the pumpkin.
  • twine, raffia, felt or extra fabric (in case you need to hide any exposed hot glue around the stem, I only needed it on 2 of my 3 pumpkins.)
Instructions:

Cut your fabric into a rectangle, different dimensions will give different shapes.  Technically, a standard pumpkin shape would be width = 2 times the height.  I wanted various shapes that would complement each other, so for reference my cut pieces were:
orange fabric:  15.5 wide by 7.5 tall
purple fabric:  32 wide by 13 tall
stripe fabric: 21 wide by 16 tall

Fold your fabric in half, right sides together and hand sew, machine sew or even hot glue the side seam.


Next, sew a wide basting stitch along the bottom of the tube.  (I tried to use my machine for this basting stitch, but it works better hand sewn since you can get a much wider stitch.)  Gather the bottom up so it is tightly closed and sew a few stitches to secure the bottom.


Flip the fabric right side out and stuff your pumpkin.  (To conserve my stuffing, I made a hole in the middle of the stuffing and used plastic bags and fabric scraps, then put stuffing on top.)


Sew a basting stitch along the top and close it the same way as the bottom.
Pull the top closed and add a few stitches to secure it.


Wrap the twine/string around the pumpkin 2 to 4 times (whatever looks best to you.) Wrap it tightly and tie it off on the bottom.  The tension gives the pumpkin the the puffiness.  If the knots at the bottom bother you, you could cut a circle of fabric/felt and hot glue it over the knots to cover them up.


Add a dollop of hot glue to the top of the pumpkin and attach your stem.


Add your leaves and twine with a little more hot glue and wallah!  A pumpkin!  Cute isn't it?


Thank you http://www.scatteredthoughtsofacraftymom.com for this brllant tutorial!

Tweet this post! Visit the Mad About Pink Shop Now!

Sunday, October 6, 2013

Halloween DIY: Minions pumpkins via CraftberryBush

Look at this! Isn't that such a great tutorial to do with kids, without damaging your fingers carving?
You can find the full instructions at Craftberrybush

Happy week end,
Jess
Tweet this post! Visit the Mad About Pink Shop Now!

Sunday, August 25, 2013

and from the leather leftovers ...a necklace

Why throw away leather scraps? here's what I made from the leftovers of my leather folded clutch I showed you last week.

I hope you like it...


Apologies for the bad photo but I took it from my mobile. Tutorial will come soon.

Jess
Tweet this post! Visit the Mad About Pink Shop Now!

Friday, August 23, 2013

Faux Leather folded clutch DIY - quick tutorial

Hello, being on holiday is fantastic!
I'm relaxed, I enjoy spending time with my kids and I also have some time left to create. I needed it so much.

I'm attending a wedding next month and I didn't have a matching handbag to my grey/black/white dress so here what I made.

Material:
2 pcs faux leather silver (smaller than a FQ)
2 pcs ''              '' black (smaller than a FQ)
1 white lace
4 pearls
white ribbon
1 black zipper 
1 magnet closure (optional)

I didn't use any lining as the leather had a nice finish at the back. So I just cut precise edges and started sewing like a normal pouch.....this is what a call a nice SHORTCUT.... lining would have been nice though but it's too late now.

Of course it's not real leather. This is what I call Cheap and Chic solution so my hubby won't complain about me spending money on accessories.

The dress I'll be wearing is this one, with this hat:

I hope you like it as it was my first try using faux leather. If you need any help, just leave a comment.

Have a good day!
Jess

Wednesday, July 31, 2013

Muffin Favours I made .... for my son's party

Here's a great and cheap idea for party favours. I made those for my son's baptism. You have a million ways to customize it. I had one night to prepare them so this is what I did. I hope it can inspire you for last minute favours. if you don't have time, just ask me! but only for Italy!
p.s. what a bad shop owner I am.... I forgot to mention that I have more products in store....I promise it's worth a look. Click here! Have a great summer! I'm off to prepare my suitcase :-) Jess

Saturday, July 27, 2013

Giveaway time with Mad About Pink and Veronica Country Life


Here's a chance to win one of my buttons kits and 4 sewing patterns from Veronica Country Life

To win just leave a comment on Facebook here before the 20/08!

Good luck and have a good week end,
Jess

Tweet this post! Visit the Mad About Pink Shop Now!

Saturday, July 20, 2013

Easy Saturday craft diy: pom pom bookmarks

Hey, what a great sunny day here in Italy. It's so hot that it's nice to explore the blogosphere until the sun starts hiding.

Here's an easy project for you little crafty moments I found on Rising Up Rubies:

You need:


  1. wool
  2. paper clips
  3. scissors


1
paperclip & pompom bookmarks ♥
2paperclips & pompom bookmarks
3paperclip & pompom bookmarks ♥

And it's done! Make tons and give them away.
Jess

Tweet this post! Visit the Mad About Pink Shop Now!

Saturday, June 22, 2013

Productive week - create create and create

This week with no children, I've dedicated all my free time to create! Buttons in a box and more stickers for my shop. I love the results and will definitely make more this week-end. For this post, I'll keep it to few words and a lot of images. I hope you like them! Of course, if you like them so much, they can be purchased here!


My new stickers for packages - entirely designed by me!
Have a good week end and off to London now,
Jess


Tweet this post! Visit the Mad About Pink Shop Now!

LinkWithin

Related Posts with Thumbnails