Monday, January 3, 2011

Kiwi's Blogger Follower Swap #3

Hello everyone,

just wanted to let you know that I'll be taking part of this swap from swap-bot.com.

To all participants, I'm hosting a giveaway ending the 6th. Click here if you'd like to participate!
Have a good day!

Sunday, January 2, 2011

Tutorial: Turn your old scarf into a vendor apron (30 min sewing project)

How can you see that I’m on holiday? Simple, I’ve posted two of my own tutorial in 2 days… and I love it. I’ve been so thankful to people that posted theirs before that I’ve always felt that I should have made an effort to create new ones to teach and inspire others like they did to me. 

Lately, I’ve been participating to a lot of craft markets and never had  my scissors, pens, coins, business carts etc handy  while serving my customers so this tutorial was inspired with this in mind. I’m sure that all of you crafters around the globe would love to make one! 


This tutorial is suitable to beginners too as I kept it very simple but can be improved by adding ribbons, zip and appliqués of your choice.
Making all this doesn’t need to be expensive: Recycle your old scarf or fabric scraps and the trick is done.
I’ve used a cotton scarf received from Kenya that I thought was too big for my neck so I decided to shrink it and with the remnants to make an vendor apron. So now I have a scarf and an apron!!!

Let’s get started:
MATERIAL NEEDED:
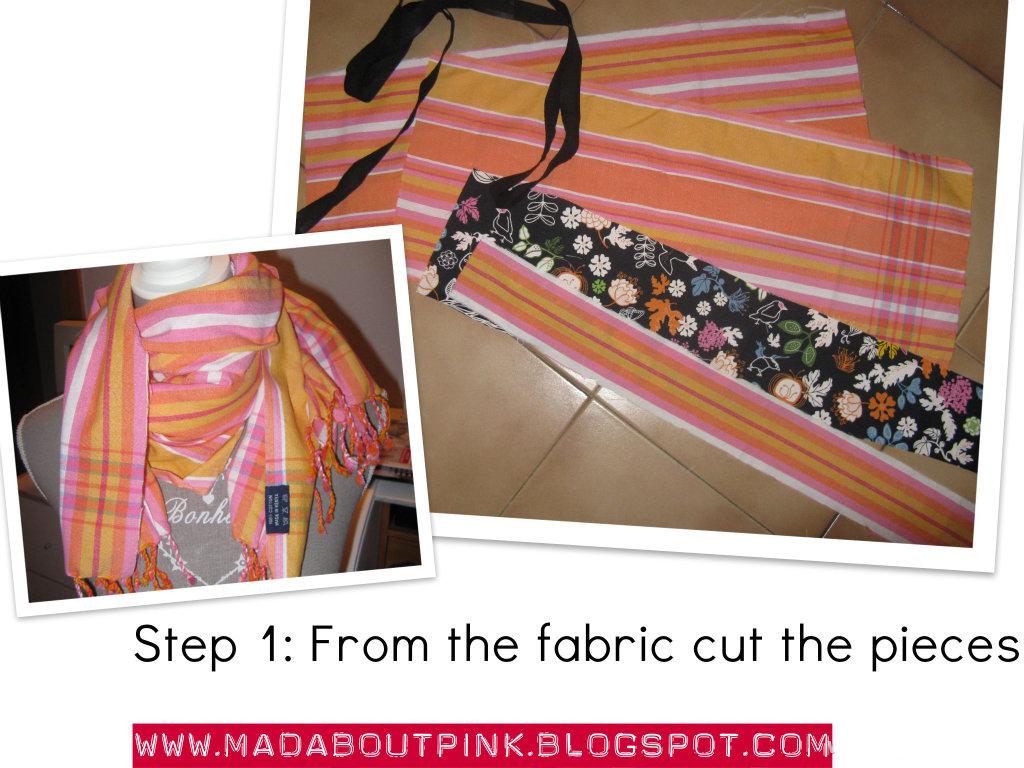
2 X FABRIC A : 70 X 28 CM ( the orange/pink one in the pictures)
1 X FABRIC C: 70 X 17 CM ( the black one in the pictures)  I’ve cut this one as a trapeze keeping the higher side 17 cm and the small one around 12 cm. The trapeze shape is optional as my fabric was a leftover. You can easily keep it 70 x 17 cm.
1 X FABRIC B: 70 X 8 CM ( I’ve used the same fabric as A in this project)
2 mt of BIAS TAPE (Optional: cut some fabric stripes instead and make your own belt or use a wide ribbon according to the supplies you have at home)


Step 1: Cut the pieces as shown above


Step 2:  Sew, for the pocket pieces, (B and C) the folded upper edges to cover the nasty cut and to give a clean look to the pieces.


Step 3: Pin  the A piece (only the front one for now), the B and the C in place and sew only the sides. Then sew in between them according to the number of pockets you want to have. You can make smaller distance one for pens and bigger ones for note books etc.


Step 4: Put the last piece from A right side together with the piece we just did and sew all around leaving 10 cm opening or less for turning inside out later. Cut the corners.

Step 5: Turn inside out and stitch the opening left


Step 6: Attach the bias tape to the upper length making sure that the middle point of the bias tape is the middle of the apron (you don't want different size strings to attach your apron!)


Et voilà! Enjoy!

Please email me if you have any trouble making this and share your photos with us.

Note: this tutorial belongs to Mad About Pink blog  for personal use only, thanks for linking it back to my site when you share it on your site. If you let me know, I'll be very happy to visit!

Thursday, December 30, 2010

How to make candles in a jar the Mad About Pink way - TUTORIAL

Dear all,

after the great success of my Ring in a Jar, I've decided to share my tutorial with all of you.

“Candle in a Jar” in 5 easy steps
1-Melt the Wax in bain-marie
 
 
Place on low temperature a pot with water and inside it a coffee can or another pot (that you won’t use anymore for cooking).  While your water is warming up, you can start placing the wax in the coffee can. If you prefer, you may use old candles or a combination of paraffin from old candles or leftovers.  Mixing old candles leftovers can give you cool effects and it’s good for recycling. Just match the colors before!
 
·         Cut up the wax into small chunks, and place it in the can. If you're using old candles, choose colors that will mix well. You'll also want to remove any charred wick ends. 
·         Stir with an old spoon or Popsicle stick. If there are any old candles in the mix, take a fork and pull out any old wicks that have been freed from the old candles. 

2-Color the wax (Optional)
 
Crayons are the best way to color candles. Combining a white crayon in with a colored one makes a softer color. Color schemes possibilities are endless!
·         Break crayons into small pieces. 
·         When  the wax is nearly melted, drop the crayons into the coffee can. 
·         Stir to mix color thoroughly. 

3-Make your own wicks 
 
·         Cut thick cotton string about 7/8 cm longer than your mold will require. 
·         When your wax is melted, dip cotton string in wax. 
·         Hang your wicks from a clothesline or place them on waxed paper, being sure to lay them out in a straight line so you'll have nice straight wicks .
·         Scent your wicks: If you are making your own wicks, you have the option of scenting the wicks rather than the candles. Before dipping wicks in wax, soak the wicks in a fragrance or perfume 

4-Pour the wax
 
Remove the can from the boiling water. You'll want to use a pot holder or a cloth to prevent you from burning your fingers. Let the wax cool for a minute or two before being poured into the jar. 
·         Tilt the jar slightly, towards the can. This will improve the chances of spill-free transfer. 
·         Pour wax slowly into the jar

5-Insert the wick
  
You'll need a pencil to lay across the mouth of the jar in order to hold the wick in place while the wax hardens.
·         Measure the wick. Take the wicks and lay them along the length of the jar. Add an extra 2cm  of string section of wick, to lit the candle later on plus an extra 4/5 cm to wrap around the pencil. 
·         Insert the wick into the center of the jar. Notice the amount of wick that remains outside the jar.
·         Wrap the end of the wick around the pencil. This holds the wick in the center of the wax while it cools. 

Let it rest for a day and then enjoy!
Use this technique with any glass jars or tin cans, label then the way you like the most and give them as a gift.
If you are having any trouble with this tutorial please email me and I'll help you!
This is only for personal use, please ask before sharing, I never say no, but it's nice to know. Thank you!

Tuesday, December 28, 2010

2011 New Year Ideas

Here's something I had to share from How Does She?  
10 GREAT IDEAS TO START THE NEW YEAR IN STYLE
1.  Add to bottle of  sparkling cider for a fun hostess gift this New Year’s Eve. From Beth ProudFoot
2.  New Year Printable to support Operation Shower.  From Love the Day
An amazing collection of 2011 printables!
3.  Perfect little banner to help you ring in the new year!! From *a little lovely
4.  Time is ticking with these fun midnight cookies from The decorated cookie
5.  A New Year’s greeting card in case you didn’t have time to send out Christmas cards from the talented Monika Wright.  Here is her free printable collection! It’s awesome!
6.  Organizing time for the new year! Rounding out the free printable calendar collection to help you get ready for 2011.  From Creative Mama
7.  Welcome 2011 from It’s a Crafty Life
8.  Ring in 2011 with festive flair with your very own Happy New Year flag! From BNute Productions


Up to 50% Off Home and Fashion Summer Sale
Mad About Pink

LinkWithin

Related Posts with Thumbnails