
How can you see that I’m on holiday? Simple, I’ve posted two of my own tutorial in 2 days… and I love it. I’ve been so thankful to people that posted theirs before that I’ve always felt that I should have made an effort to create new ones to teach and inspire others like they did to me.
Lately, I’ve been participating to a lot of craft markets and never had my scissors, pens, coins, business carts etc handy while serving my customers so this tutorial was inspired with this in mind. I’m sure that all of you crafters around the globe would love to make one!

This tutorial is suitable to beginners too as I kept it very simple but can be improved by adding ribbons, zip and appliqués of your choice.
Making all this doesn’t need to be expensive: Recycle your old scarf or fabric scraps and the trick is done.
I’ve used a cotton scarf received from Kenya that I thought was too big for my neck so I decided to shrink it and with the remnants to make an vendor apron. So now I have a scarf and an apron!!!
Let’s get started:
MATERIAL NEEDED:

2 X FABRIC A : 70 X 28 CM ( the orange/pink one in the pictures)
1 X FABRIC C: 70 X 17 CM ( the black one in the pictures) I’ve cut this one as a trapeze keeping the higher side 17 cm and the small one around 12 cm. The trapeze shape is optional as my fabric was a leftover. You can easily keep it 70 x 17 cm.
1 X FABRIC B: 70 X 8 CM ( I’ve used the same fabric as A in this project)
2 mt of BIAS TAPE (Optional: cut some fabric stripes instead and make your own belt or use a wide ribbon according to the supplies you have at home)
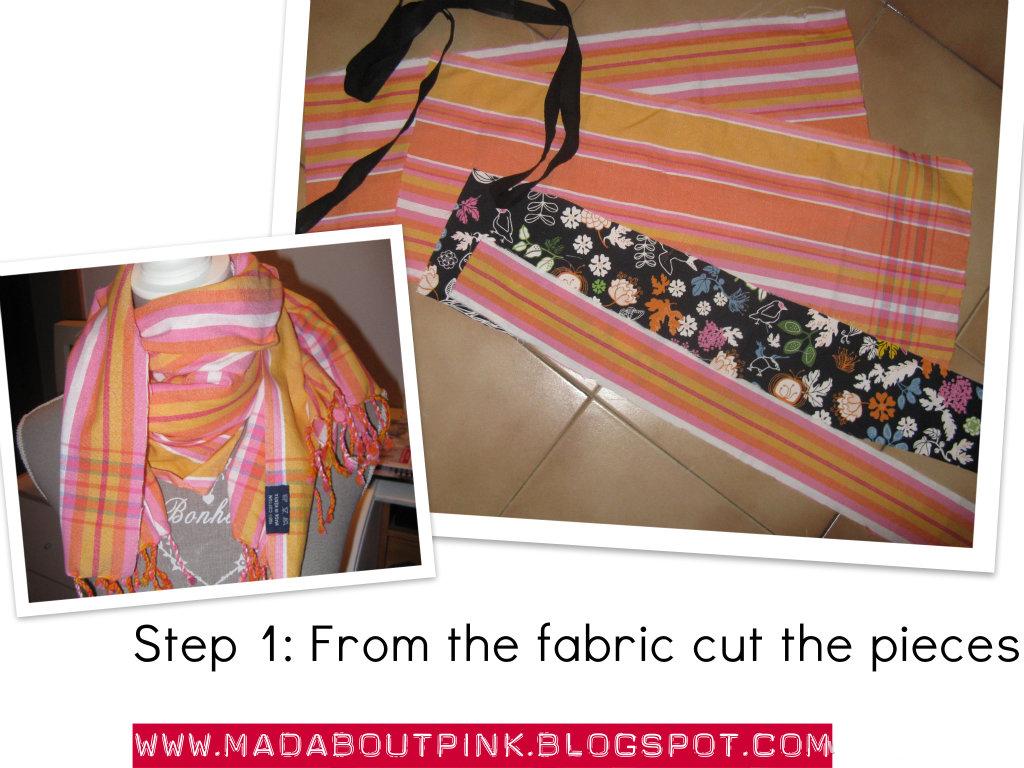
Step 1: Cut the pieces as shown above

Step 2: Sew, for the pocket pieces, (B and C) the folded upper edges to cover the nasty cut and to give a clean look to the pieces.

Step 3: Pin the A piece (only the front one for now), the B and the C in place and sew only the sides. Then sew in between them according to the number of pockets you want to have. You can make smaller distance one for pens and bigger ones for note books etc.


Step 4: Put the last piece from A right side together with the piece we just did and sew all around leaving 10 cm opening or less for turning inside out later. Cut the corners.

Step 5: Turn inside out and stitch the opening left

Step 6: Attach the bias tape to the upper length making sure that the middle point of the bias tape is the middle of the apron (you don't want different size strings to attach your apron!)


Et voilà! Enjoy!
Please email me if you have any trouble making this and share your photos with us.
Note: this tutorial belongs to Mad About Pink blog for personal use only, thanks for linking it back to my site when you share it on your site. If you let me know, I'll be very happy to visit!
I'm not sure if you have comment moderation enabled or if my comment typing was just wasted away when I lost my connection, but I'll type it again. :)
ReplyDeleteI'm too addicted to scarves, but this is a really neat idea. I do need a new apron, tho...hmmm..... ;)
Hello, I don't have comment moderation. Thanks for letting me know and Happy New year!
ReplyDeleteI loved this idea! Thanks for posting it! I am also a new follower I can not wait to see what you do next!
ReplyDeleteThis is a great idea! And I also like the scarf/colors you chose to do it.
ReplyDeleteHappy new year! I'm going to follow you. :)
-allthisbeauty from SB
Very cool pattern!
ReplyDeleteAimee (darzy30) - swapbot
Blog Comments
thank you so much! I can't wait to make this!
ReplyDeleteI absolutely love this. I am now looking at my huge scarf collection and contemplating which one to use!
ReplyDeleteGreat idea and tutorial!!