All via Make it and Love it
The tall waistband is folded over for a comfy fit.

Depending on what size you're making, cut the bottom section of the shirt off. This will be the main section of the skirt. And remember, the bottom hem of the shirt will be the new bottom hem of the skirt......so don't cut it off.
Then, if you have enough fabric left on the shirt cut out a piece that's big enough for the yoga band. Mine came from the back of the shirt. (If not, use some fabric from a different shirt or some knit fabric from your scrap pile.) My waist band piece was 20 inches wide x 9 inches tall........but if I had more fabric, I would have made it about 20 x 11 inches. Just to give the waistband more height. Because I love an even taller/adjustable waist band.
Then fold this piece in half lengthwise and sew with a 1/2 inch seam allowance along the two shorter ends, creating a tube. (I used a serger but if you're using a sewing machine, use a zig-zag stitch or a knit freindly stitch. Need help with knits? Click here for more info.)
Then turn your tube right side out and fold the tube down inside itself in half, keeping the right side of the fabric on the outside.
Then gather up the top raw edge of the bottom section of the skirt. Make your basting stitch about 1/2 inch from the top. (Need help with gathering? Click here.) Gather in the skirt so that it's the same width as your band that you just folded in half.
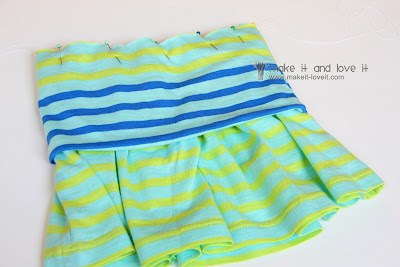
Fold the band down over the top of the gathered section and pin this section evenly in place. Don't stretch it as you're pinning.
Make sure you are pinning the raw edge of the skirt with the 2 raw edges of the folded band. The actual fold of the band is at the other end of the band..........shown in the upper left side of the image below.
Now, serge or zig-zag those layers together (3 layers in all), using a 1/2 inch seam allowance.......all the way around the skirt. If your basting stitch happens to be showing, pull on those threads to remove them.
Then iron/steam that seam flat......along with the upper fold of the band. (And if you had just a bit of stretching while sewing the layers together in the last step, steaming will help shrink it back down a bit. But if it was over-stretched, you may have to pick it out and try again. Or if it just keeps stretching out and the waist band is too big..........make your band a bit smaller and then adjust the gathering as well. That should take care of it.)
Visit the Mad About Pink Shop Now!


Ohhh this is great. So cute!
ReplyDeleteI am a new follower
ReplyDeleteLove your blog
Very cute my daughter loves skirts.
Stop by any time
http://www.etsy.com/shop/ThisanThatBoutique
http://thisnthatboutiqueblog.blogspot.com/