Showing posts with label food ideas. Show all posts

Saturday, December 21, 2013

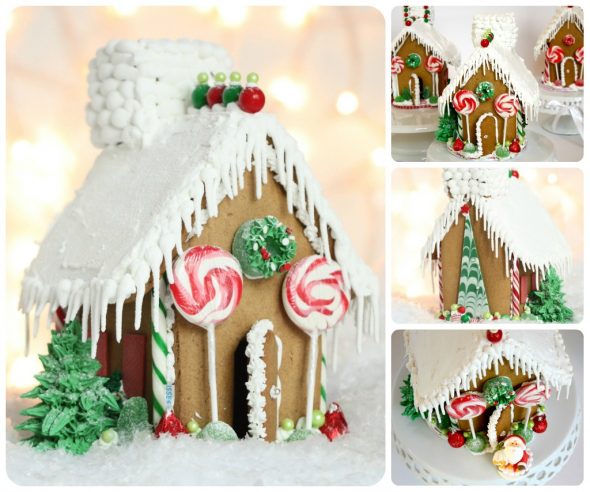
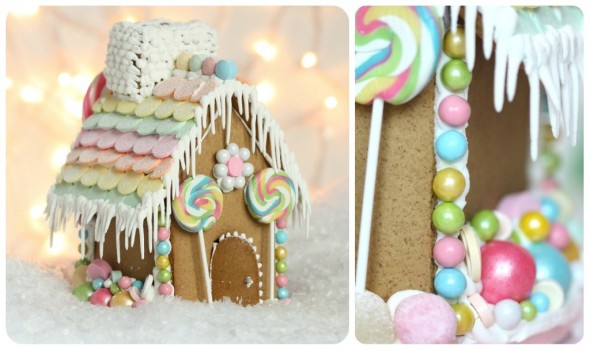
Gingerbread House and Royal Icing recipe


Hello everyone,
Christmas is almost here and today I got given my first present by a special Santa's helper. I got one of those kit from Ikea to make a gingerbread house.
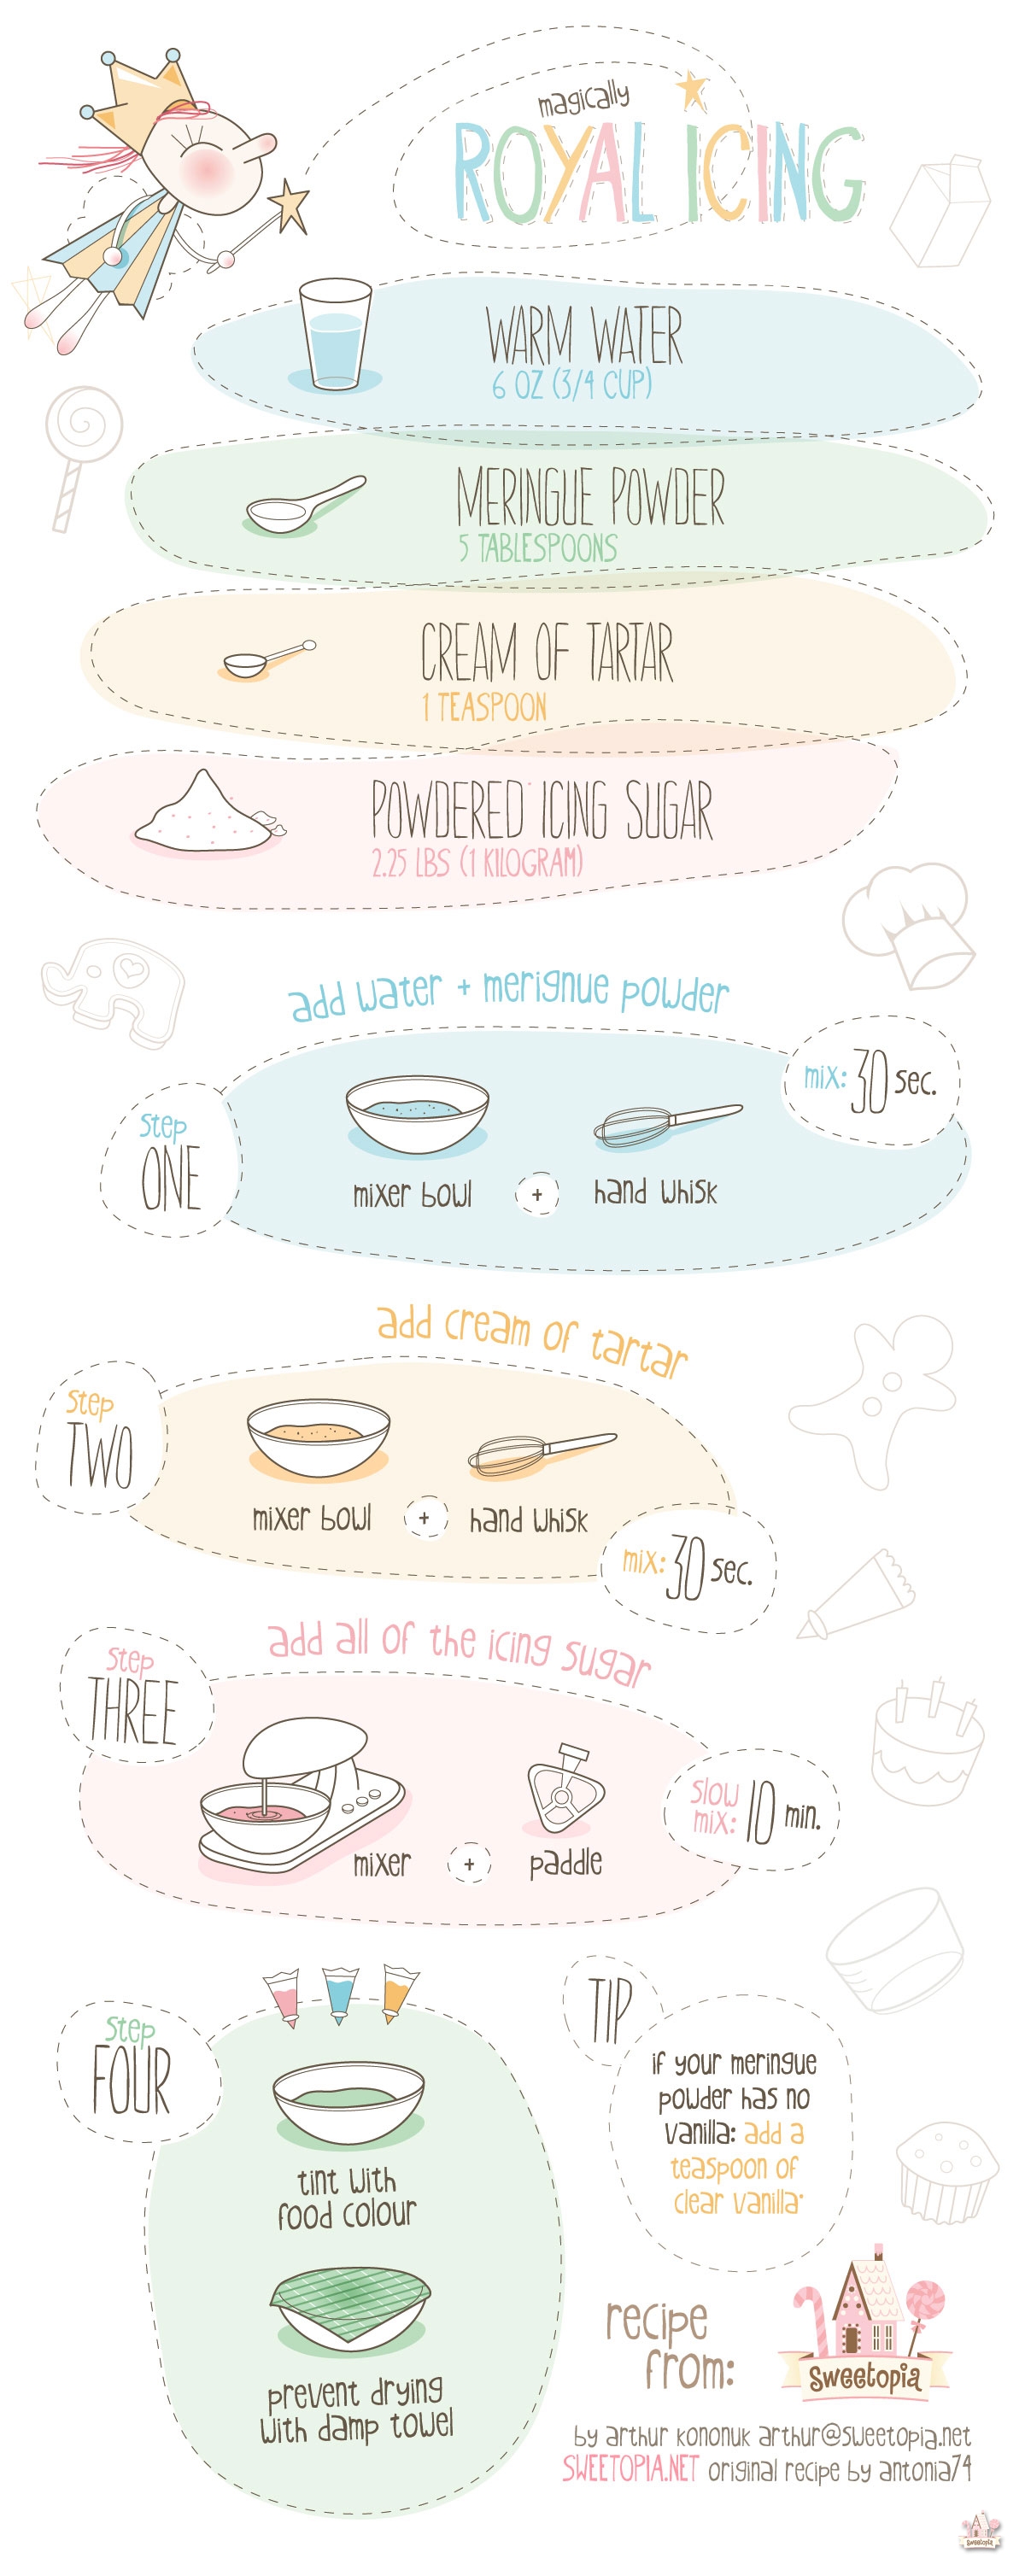
So I decided to share some ideas and at the bottom an easy Royal Icing recipe.

ginger bread house gingerbread house 2009

Images via Sweetopia.com

Royal Icing recipe


Tweet this post! Visit the Mad About Pink Shop Now!

Wednesday, July 31, 2013

Muffin Favours I made .... for my son's party

Here's a great and cheap idea for party favours. I made those for my son's baptism. You have a million ways to customize it. I had one night to prepare them so this is what I did. I hope it can inspire you for last minute favours. if you don't have time, just ask me! but only for Italy!
p.s. what a bad shop owner I am.... I forgot to mention that I have more products in store....I promise it's worth a look. Click here! Have a great summer! I'm off to prepare my suitcase :-) Jess

Saturday, August 18, 2012

It's hot and I want a party like this: Watermelon Party

There is nothing better than watermelon when you are hot! and Italy has the best ones ever on earth.
 This is what inspired me to search for a great Watermelon party. Look at this one from Little things creations.
 Enjoy!!!!


Credits

Table styling: Fara Party Design

Party Printables: Little things Creations

Watermelon Slice Party Favor Boxes: Paper Glitter

Cupcakes: Cupcakes by Yady

Rice crispy Treats idea: Glorious Treats

Tweet this post! Visit the Mad About Pink Shop Now!

Friday, April 22, 2011

Get ready for Easter: Ideas and tutorials from the blogosphere

Here's some ideas to make your handmade Easter! Enjoy!

Bunny treats 759x1024 Crispy Bunny Treats

. . . . . . . . . . . . . . . .
bunny ear cupcake toppers


. . . . . . . . . . . . . . . . . .
 Happy Easter board

happyeasterboard
. . . . . . . . . . . . . . . . .

this spring butterfly mobile


 All via eighteen25

  If you don't have time and you are looking for great gifts, visit my shop here for Easter baskets and napkins.


I can customize them! Email me!

Saturday, April 9, 2011

DIY wedding favours from Ruffled: Vanilla

As always, I find a lot of inspiration on Ruffled. Enjoy!

Vanilla extract is such a wonderful wedding favor! It’s memorable, as sweet as you, and it will be cherished by your guests! It’s so easy & affordable to make at home, you’ll wonder why you ever bought any at the grocery store! All you need are vanilla beans, a bottle of your favorite spirit, and time. (Added bonus: your kitchen will smell amazing!)
Like true love, vanilla extract gets better with age. You’ll want to start this project at least three months before your wedding so that the beans have plenty of time to impart their flavor to the base. If you are able to start this project six to eight months before your wedding, your guests will be rewarded with divine vanilla extract unlike they have ever tasted – unbelievably rich, concentrated, and fragrant! Make sure to set aside a few for yourself.
Good vanilla extract is made from only two ingredients: beans & booze. Before you begin, you’ll want to order at least 1/4 Lb of bulk vanilla beans for every 15 2oz. favors you’d like to create. No need to splurge on the beans – Grade ‘B’ beans (sometimes known as chef’s quality) are more affordable than higher grades because they’re slightly less plump. They are perfect for making delicious extract!
You’ll also want to choose an appropriate alcohol base for your concoction. Good quality, mid-range hard spirits with a proof of at least 60 work best. Vodka & white rum produce a clean-tasting vanilla extract, while spiced rum and brandy impart a lovely flavor of their own.
1. Begin by slicing the vanilla beans lengthwise, from tip to tip. This opens up the bean so that the alcohol can absorb the flavor of the “caviar”. (These are the tiny seed-like flecks inside the bean.)
2. Cut each sliced bean in half across the middle.
3. Open the bottle of alcohol. To make room for the beans, pour approximately 1 C. into a mason jar or glass and set aside. Insert the beans into the 750ml bottle, one-by-one, until all are submerged beneath the surface. If any air remains at the top of the bottle, pour some of the reserved spirit back inside. (If any beans are left exposed to the air, undesirable mold may develop.)
4. Cap the bottle and give the concoction a few gentle shakes. The alcohol will begin to darken slightly as the oil and natural sugars from the bean begin to mingle. As the extract ages, it will become darker and darker until eventually it is nearly opaque. (The below image shows the difference between “just made” extract & 3-month aged extract.)
5. Now, the hardest part: waiting! Store the bottle in a cool, dark location like the back of a kitchen cupboard. (Basements are great vanilla-caves too.) Give the bottle a gentle shake once a week for the first month, and then every few weeks after that. No need to be precise – it’s just good to move the alcohol around the beans from time-to-time. After a few months, give the extract a sniff – you should start to notice the harsh alcohol scent being replaced with vanilla. The extract is ready to use when the harshness has disappeared & the vanilla smells “heady”. (The extract can be used before this time, if you would like to incorporate a bit of the alcohol’s notes. Spiced rum vanilla extract makes delicious baked goods!)
6. When you’re ready to bottle your favors, simply insert the funnel into the neck of each 2oz bottle & carefully fill, making sure to leave a bit of airspace at the top. Don’t throw the leftover bean pieces away! You can insert a small piece of each bean in the bottles for a gourmet touch. You can also create your own vanilla sugar by drying the leftover beans & placing them into an airtight jar with white sugar. Use this sugar to sweeten tea or baked goods!
7. After the bottles are capped tightly, wind a 7″ – 10″ length of string around each neck & tie a sweet bow or knot. Red & white striped bakers twine is particularly cute! The string not only gives your favors a complete look, it also catches any future drips that may occur as your guests use the extract.
8. Download the Vanilla Extract Labels and print onto 8.5″ x 11″ label paper. Use a 1.5″ round punch to cut out the circles & then carefully apply a sticker to each bottle.
9. Get hitched, share your vanilla extract favors and live happily ever after!
Supplies:
- 1/4 Lb vanilla beans (approximately 25-30 individual beans – they can be purchased in bulk online for much, much cheaper than you’ll find in grocery stores. 
- 1 750 ml bottle of your favorite spirit (Rum, Vodka, Brandy, etc.)
- 15 2oz. amber bottles - 15 7″ – 10″ lengths of your favorite string, twine, or yarn
- Modern Vanilla Labels (printable file here)
- Full page 8.5″ x 11″ label paper
- scissors or 1.5″ round punch
- sharp knife & cutting board
- narrow-neck funnel

For more DIY projects visit this wonderful website


Visit the Mad About Pink Shop Now!

Tuesday, December 28, 2010

After Christmas rush - 10% OFF Mad About Pink (limited time)

Hi there,
I hope you had a wonderful Christmas. Mine was great even if my son was afraid of Santa :-) 
I'm so happy I have 10 days off work but I'm already feeling restless. Today, I've been renewing Mad About Pink look... what do you think? (For this, I have to thank Lisa, she did such an excellent job!) as well as tidying up the all house ( I so hate it!) and teaching my son to use a skateboard.

 I've also been working on new products... and finally restocking my shop, updating my Facebook page and of course eating more than I should!


Don't forget to enter my GIVEAWAY! CLICK HERE to enter! Just because I have more time in hands after the big Christmas rush, I offer 10% off any order placed before the 6th of January, please email me with the list or order directly from the shop (if ordering through Dawanda, please mention BLOGGER OFFER when checking out).
 Ciao!

Saturday, December 11, 2010

A Vintage Pastel Christmas Dessert Table

Pastel Pink & Blue Christmas Party Ideas


Pastel Pink & Blue Christmas Party Ideas


Pastel Pink & Blue Christmas Party Ideas


Pastel Pink & Blue Christmas Party Ideas


Pastel Pink & Blue Christmas Party Ideas


Pastel Pink & Blue Christmas Party Ideas


Pastel Pink & Blue Christmas Party Ideas


*****
Recipe Resources & Vendor Credits:
• Vanilla Cupcakes with Cream Cheese Frosting
• Decorated Sugar Cookies
• White Chocolate dipped Oreos (store bought) with custom royal icing transfers (by me)
• Coconut Date Bites
• Handcrafted Marshmallows (by Fusion Sweets)
• Assorted candies
Styling, flower arrangements, cookies and cupcakes – Glory Albin.
Photography by Gene Chutka and Glory Albin.
Mad About Pink

Tuesday, August 17, 2010

Jam labels and more labels to dowload

This morning my auntie was making Mirabelle jam ( a special plum that grows in this part of France, the Lorraine region) and she inspired me with this post. Hope you like it!

If you are not sure about what label to use and how to present your jams and preserves, just keep reading!
And they all can be download!
Home-made jams or chutneys make heartfelt wedding favors that can be dressed to match any colour or theme. Simply add a swatch of fabric and pretty ribbon at the top. Bonus: label the jars with guests’ names and have them double as place cards. Label by www.greenka.etsy.com
Welcome neighbours and congratulate friends with something sweet. Grab a basket, spray paint it your favourite colour, then pack with savoury home-made spreads and jams in a variety of colours. A fresh, inspired gift the recipient is sure to love.

Don’t forget a job well done – use this calendar label to commemorate your canning date, and keep the pantry organized. Alternatively, give it in recognition of a special occasion – such as births, weddings, anniversaries and more – and the calendars add a fun way to mark the date.

Nothing conjures up the bounty of the earth like the feeling of a fall harvest. These colorful leaf-inspired labels are the perfect topper or gift tag for your canned fruits, and pair great with yarn and felt accents in matching hues. Label by www.notepourri.etsy.com.
 Dress up traditional jars for the holidays with these bold, modern labels for a fancy touch. Use contrasting ribbons to accent the jars, and disperse individually or in colorful sets. The center is left blank to include a handwritten or typed seasons greeting of your own. Label by www.notepourri.etsy.com

This retro-patterned label is complete with cursive “homemade,” reinforcing the love and effort that went into the treats. Simply drop in the name of your recipe, and you’ve got a cool gift for recipients from any era. Label by www.bohtieque.etsy.com.
 All and more via Sweet Preservation

Saturday, August 7, 2010

France here I come and for you...Macarons recipe

I know, I should be packing my bags to leave but I couldn't resist to post about something I love  from France... They are an eye and mouth candy to me.... what are they? Without any doubts I'm talking about macarons.

Here's a simple recipe and some cute photos to make you want to eat them.
And finally I'm off....have a good Holiday!

Basic Macaron Cookie

Steps adapted from A La Cuisine.
Ingredients
225 grams icing sugar
125 grams ground almonds
110 grams egg whites (about 4), aged overnight at room temperature
30 grams granulated sugar
Pinch of salt
Procedure
1. On three pieces of parchment, use a pencil to draw 1-inch (2.5 cm) circles about 2 inches apart. Flip each sheet over and place each sheet on a baking sheet. [Note: You only have to draw circles on the parchment paper if you want absolutely even-sized macarons. If you're skilled with piping and don't mind eyeballing the amount of batter per cookie, skip this step.]
2. Push almond flour through a tamis or sieve, and sift icing sugar. Mix the almonds and icing sugar in a bowl and set aside. If the mixture is not dry, spread on a baking sheet, and heat in oven at the lowest setting until dry.
3. In a large clean, dry bowl whip egg whites with salt on medium speed until foamy. Increase the speed to high and gradually add granulated sugar. Continue to whip to stiff peaks—the whites should be firm and shiny.
4. With a flexible spatula, gently fold in icing sugar mixture into egg whites until completely incorporated. The mixture should be shiny and 'flow like magma.' When small peaks dissolve to a flat surface, stop mixing.
4. Fit a piping bag with a 3/8-inch (1 cm) round tip. Pipe the batter onto the baking sheets, in the previously drawn circles. Tap the underside of the baking sheet to remove air bubbles. Let dry at room temperature for 1 or 2 hours to allow skins to form.
5. Bake, in a 160C/325F oven for 10 to 11 minutes. Use a wooden spoon to keep the oven door slightly ajar, and rotate the baking sheet after 5 minutes for even baking.
6. Remove macarons from oven and transfer parchment to a cooling rack. When cool, slide a metal offset spatula or pairing knife underneath the macaron to remove from parchment.
7. Pair macarons of similar size, and pipe about 1/2 tsp of the filling onto one of the macarons. Sandwich macarons, and refrigerate to allow flavors to blend together. Bring back to room temperature before serving.

Bittersweet Chocolate Cream Ganache

- makes about 2 cups (550 grams) -
Ingredients
8 ounces (230 grams) bittersweet chocolate, preferably Valrhona Guanaja, finely chopped
1 cup (250 grams) heavy cream
4 tablespoons (2 ounces; 60 grams) unsalted butter, at room temperature
Procedure
1. Place the chocolate in a bowl that's large enough to hold the ingredients and keep it close at hand. Bring the cream to a full boil in a heavy-bottomed saucepan. While the cream is coming to the boil, work the butter with a rubber spatula until it is very soft and creamy. Keep the butter aside for the moment.
1. While the cream is at the boil, remove the pan from the heat and, working with the rubber spatula, gently stir the cream into the chocolate. Start stirring in the center of the mixture and work your way out in widening concentric circles. Continue to stir—without creating bubbles—until the chocolate is completely melted and the mixture is smooth. Leave the bowl on the counter for a minute or two to cool the mixture down a little before adding the butter.
3. Add the butter to the mixture in two additions, mixing with the spatula from the center of the mixture out in widening concentric circles. When the butter is fully incorporated, the ganache should be smooth and glossy. depending on what you're making with the ganache, you can use it now, leave it on the counter to set to a spreadable or pipeable consistency (a process that could take over an hour, depending on your room's temperature) or chill it in the refrigerator, stirring now and then. (If the ganache chills too much and becomes too firm, you can give it a very quick zap in the microwave to bring it back to the desired consistency, or just let it stand at room temperature.)

(photos from Mad Baker, La duree, Etsy and random on the net)

Up to 50% Off Home and Fashion Summer Sale
LinkWithin

Related Posts with Thumbnails