Pages

Wednesday, April 27, 2011

DIY: Re-purposed ruffle skirt


The tall waistband is folded over for a comfy fit.

Depending on what size you're making, cut the bottom section of the shirt off.  This will be the main section of the skirt.  And remember, the bottom hem of the shirt will be the new bottom hem of the skirt......so don't cut it off.  

Then, if you have enough fabric left on the shirt cut out a piece that's big enough for the yoga band.  Mine came from the back of the shirt.  (If not, use some fabric from a different shirt or some knit fabric from your scrap pile.)  My waist band piece was 20 inches wide x 9 inches tall........but if I had more fabric, I would have made it about 20 x 11 inches.  Just to give the waistband more height.  Because I love an even taller/adjustable waist band.
Then fold this piece in half lengthwise and sew with a 1/2 inch seam allowance along the two shorter ends, creating a tube.  (I used a serger but if you're using a sewing machine, use a zig-zag stitch or a knit freindly stitch.  Need help with knits?  Click here for more info.)
Then turn your tube right side out and fold the tube down inside itself in half, keeping the right side of the fabric on the outside.


Then gather up the top raw edge of the bottom section of the skirt.  Make your basting stitch about 1/2 inch from the top.  (Need help with gathering?  Click here.)  Gather in the skirt so that it's the same width as your band that you just folded in half.
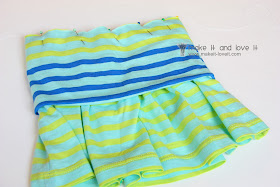
Fold the band down over the top of the gathered section and pin this section evenly in place.  Don't stretch it as you're pinning.  
Make sure you are pinning the raw edge of the skirt with the 2 raw edges of the folded band.  The actual fold of the band is at the other end of the band..........shown in the upper left side of the image below.
 Now, serge or zig-zag those layers together (3 layers in all), using a 1/2 inch seam allowance.......all the way around the skirt.  If your basting stitch happens to be showing, pull on those threads to remove them.
Then iron/steam that seam flat......along with the upper fold of the band.  (And if you had just a bit of stretching while sewing the layers together in the last step, steaming will help shrink it back down a bit.  But if it was over-stretched, you may have to pick it out and try again.  Or if it just keeps stretching out and the waist band is too big..........make your band a bit smaller and then adjust the gathering as well.  That should take care of it.)


Visit the Mad About Pink Shop Now!

Friday, April 22, 2011

Get ready for Easter: Ideas and tutorials from the blogosphere

Here's some ideas to make your handmade Easter! Enjoy!

Bunny treats 759x1024 Crispy Bunny Treats

. . . . . . . . . . . . . . . .
bunny ear cupcake toppers


. . . . . . . . . . . . . . . . . .
 Happy Easter board

happyeasterboard
. . . . . . . . . . . . . . . . .

this spring butterfly mobile


 All via eighteen25

  If you don't have time and you are looking for great gifts, visit my shop here for Easter baskets and napkins.


I can customize them! Email me!

Saturday, April 16, 2011

I need your Vote

 Hello! I've entered an Easter contest.  
I'm n. 7
If you like my table napkins and coordinated napkins holders


Visit the Mad About Pink Shop Now!

Sunday, April 10, 2011

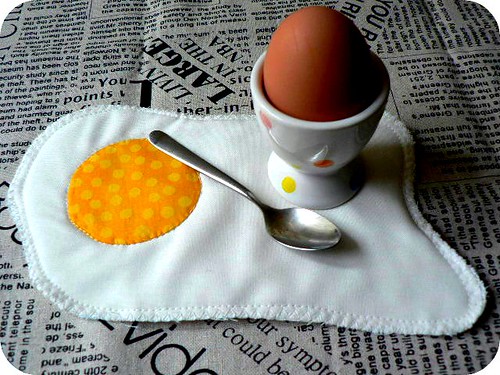
Easter projects: Egg mat tutorial via Where the Orchids Grow

Via Where the Orchids Grow...make sure you visit this great website.

Egg rug

All you need is scraps of white cotton, and a small piece of yellow fabric for the yolk, a scrap of batting and thread.


and now get your table ready for Easter.

Saturday, April 9, 2011

DIY wedding favours from Ruffled: Vanilla

As always, I find a lot of inspiration on Ruffled. Enjoy!

Vanilla extract is such a wonderful wedding favor! It’s memorable, as sweet as you, and it will be cherished by your guests! It’s so easy & affordable to make at home, you’ll wonder why you ever bought any at the grocery store! All you need are vanilla beans, a bottle of your favorite spirit, and time. (Added bonus: your kitchen will smell amazing!)
Like true love, vanilla extract gets better with age. You’ll want to start this project at least three months before your wedding so that the beans have plenty of time to impart their flavor to the base. If you are able to start this project six to eight months before your wedding, your guests will be rewarded with divine vanilla extract unlike they have ever tasted – unbelievably rich, concentrated, and fragrant! Make sure to set aside a few for yourself.
Good vanilla extract is made from only two ingredients: beans & booze. Before you begin, you’ll want to order at least 1/4 Lb of bulk vanilla beans for every 15 2oz. favors you’d like to create. No need to splurge on the beans – Grade ‘B’ beans (sometimes known as chef’s quality) are more affordable than higher grades because they’re slightly less plump. They are perfect for making delicious extract!
You’ll also want to choose an appropriate alcohol base for your concoction. Good quality, mid-range hard spirits with a proof of at least 60 work best. Vodka & white rum produce a clean-tasting vanilla extract, while spiced rum and brandy impart a lovely flavor of their own.
1. Begin by slicing the vanilla beans lengthwise, from tip to tip. This opens up the bean so that the alcohol can absorb the flavor of the “caviar”. (These are the tiny seed-like flecks inside the bean.)
2. Cut each sliced bean in half across the middle.
3. Open the bottle of alcohol. To make room for the beans, pour approximately 1 C. into a mason jar or glass and set aside. Insert the beans into the 750ml bottle, one-by-one, until all are submerged beneath the surface. If any air remains at the top of the bottle, pour some of the reserved spirit back inside. (If any beans are left exposed to the air, undesirable mold may develop.)
4. Cap the bottle and give the concoction a few gentle shakes. The alcohol will begin to darken slightly as the oil and natural sugars from the bean begin to mingle. As the extract ages, it will become darker and darker until eventually it is nearly opaque. (The below image shows the difference between “just made” extract & 3-month aged extract.)
5. Now, the hardest part: waiting! Store the bottle in a cool, dark location like the back of a kitchen cupboard. (Basements are great vanilla-caves too.) Give the bottle a gentle shake once a week for the first month, and then every few weeks after that. No need to be precise – it’s just good to move the alcohol around the beans from time-to-time. After a few months, give the extract a sniff – you should start to notice the harsh alcohol scent being replaced with vanilla. The extract is ready to use when the harshness has disappeared & the vanilla smells “heady”. (The extract can be used before this time, if you would like to incorporate a bit of the alcohol’s notes. Spiced rum vanilla extract makes delicious baked goods!)
6. When you’re ready to bottle your favors, simply insert the funnel into the neck of each 2oz bottle & carefully fill, making sure to leave a bit of airspace at the top. Don’t throw the leftover bean pieces away! You can insert a small piece of each bean in the bottles for a gourmet touch. You can also create your own vanilla sugar by drying the leftover beans & placing them into an airtight jar with white sugar. Use this sugar to sweeten tea or baked goods!
7. After the bottles are capped tightly, wind a 7″ – 10″ length of string around each neck & tie a sweet bow or knot. Red & white striped bakers twine is particularly cute! The string not only gives your favors a complete look, it also catches any future drips that may occur as your guests use the extract.
8. Download the Vanilla Extract Labels and print onto 8.5″ x 11″ label paper. Use a 1.5″ round punch to cut out the circles & then carefully apply a sticker to each bottle.
9. Get hitched, share your vanilla extract favors and live happily ever after!
Supplies:
- 1/4 Lb vanilla beans (approximately 25-30 individual beans – they can be purchased in bulk online for much, much cheaper than you’ll find in grocery stores. 
- 1 750 ml bottle of your favorite spirit (Rum, Vodka, Brandy, etc.)
- 15 2oz. amber bottles - 15 7″ – 10″ lengths of your favorite string, twine, or yarn
- Modern Vanilla Labels (printable file here)
- Full page 8.5″ x 11″ label paper
- scissors or 1.5″ round punch
- sharp knife & cutting board
- narrow-neck funnel

For more DIY projects visit this wonderful website


Visit the Mad About Pink Shop Now!

Monday, April 4, 2011

Guest post and a fantastic tutorial from TO SEW WITH LOVE

This special post is for all the crafty pinkettes around the world!!!
Come with me and meet Lelanie, a great girl behind a very handmade blog To Sew with Love. She's brought with her a very nice tutorial just for us. Please visit her blog and support handmade. She's doing so much to spread the voice and she inspires us to create everyday. 
I now leave you with her. Enjoy!!!


How are you doing today, lovely blogging friends? I am Lelanie and I am here, in behalf of the other two ladies, Laarnie and Lhorie, behind
To Sew With Love
TSWL started as a Facebook group, which I created with my younger sister Laarnie, and just 7 months ago, we have decided to take the path of blogging. We were a bit hesitant at first but we warmed up right away, at the same time, overwhelmed by the number of so many warm, lovely and crafty bloggers out there.


I am in Spain, my sister is in Japan while Lhorie is in China but the distance isn’t a hindrance for us. That’s what makes the blogosphere seem so big yet so small ^^)

In our blog, you would be seeing a lot of kid-related repurposing, refashioning and upcycling projects in our blog. We just hate throwing things away. We repurpose those old pairs of pants:
Indoor Shoes from repurposed Clothes

those ill-fitting clothes of ours:
Refashioned Ill-fitting Clothes

the ill-fitting clothes of our husbands.
PJ's for my Li'l Guy from his Papi's Shirt

or grandma's curtains ^^):
We also love creating things from scratch, like pretty pillows-sleeping buddies for the kids:
Sleeping buddies for the kids

Have you seen a southern belle prettier than her?

Lhorie's Southern Belle


We love jazzing up a bit some things:
Spruce Up a Plain Looking Buggy 

We create with our kids.
Owl Pillows

We host giveaways sponsored by our lovely sponsors, a Crafty Saturday Link-up Party,

We have also recently started this Facebook page to support and promote everything handmade:


I own an Etsy shop called ArcoĆ­ris, which in Spanish means “rainbow”. I love working with colourful fabrics and making something one of a kind out of it. I especially love creating gift sets.

Today, I'd like to share with you a very quick tutorial for this Felt Flower you could use as a brooch, as a headband embellishment or as a hairclip.


You will need:
8 circles of felt for the flower (mine measured 2.25" in diameter)- or 4 big circles and 4 smaller circles for variation
4 circles of felt (same size)
1 flower shaped felt (smaller size than the circles)
Faux Pearl Beads
Headband
Brooch pin and/or hair clip
Embroidery Floss (matching color to your felt)
Glue gun
Needle


First, take one felt and fold in half. Pinch one part's edge and apply glue so you'll have this:


Fold the circle's edge on each side just beside where you have applied the glue and apply glue on each so you'll have this:


Repeat the same steps until you've finished with the 8 circles.


circles of the same size


4 big + 4 small circles


Get one of the four remaining circles, fold in 4 and mark the center with lines using disappearing fabric pen:


Attach by glue your flower petals and use the lines as guide.


In between each petal, attach by glue the remaining petals on top:


same sized circles


4 big + 4 small circles


Attach your flower felt and beads on top.


Get one felt circle and insert your brooch pin and/or hairclip by cutting a slit on the area where you want to insert it.


or:


Attach this to your flower by glue or by sewing a blanket stitch. 


You can now use this as a multi-purpose brooch like thisHowever, if you want to use this as an interchangeable headband embellishment, you'd have to follow these steps:


Get the headband you'd want to use, attach one felt circle on your headband's underside and on top of it, your felt circle with the brooch pin.


You could however use velcro or snaps if you'd be using this for a younger child or a baby.


You only need to change your flower to match your baby or kid's clothes.


Here it is used as a hair clip:


Here it is used as a headband embellishment:


I hope you liked this tutorial. We have more tutorials here.


Muchas gracias, Jessica, for having us today here in your lovely blog. We are really honoured to be doing this guest post for you. I hope your lovely readers could pop over our blog and warm it up a little with their sweet Hi’s.


Hugs,


Visit the Mad About Pink Shop Now!