Pages

Sunday, August 29, 2010

A little sneak peak of my hens night party favours

Hello, 
in the last post I mentioned I was busy making some party favours for 37 girls for a hens night.
Here they are! Brooches that turns into hair ties, to use them as much as you can. 
This is a great way to have a little souvenir of the night and at the same time to use it every day. It's so annoying to have stuff in your wardrobe that could never be used again!  So here's what I came out with: a transformable item! I'd be so happy to share with you more ideas on little party favours... so email me or leave a comment about your ideas or if you need any help.


If you want me to make customized favours for your party, email me and we'll find the perfect gift for you!


Mad About Pink

Friday, August 27, 2010

Porcupine Pin Cushion - tutorial

Hello, it's such a busy week after the holidays, work, work and more work! My day job has been very intense and my craft shop was an explosion of orders, 37 brooches for a hens night and many purse holder! I love so much to make them! but of course I had to take time to share this cute tutorial from Prudent Baby.


1. Download the Porcupine Pincushion Template here.


2. Cut out 2 side-views and 1 bottom-view from tan felt.

3. With sides pinned together whip-stitch from tip of tail to tip of nose with 3 strands of brown embroidery thread. Your stitches need to be pretty close together to hold the beans in later.


4. Add simple stitches for eyes and a satin stitch for nose, if desired.


5. Spread out the legs of your sides and align with bottom piece. (If he doesn't line up perfectly, feel free to trim him a bit.)

6. Whip-stitch top piece to bottom piece all the way around except for one leg (to allow for stuffing)

7. Stuff your porcupine firmly with stuffing.

8. Stuff the belly with (a few tablespoons, maybe?) of dried beans. You want the beans to be directly inside the felt of the belly. This gives the pincushion some stability.

9. Stitch up the last leg and tie off.

Send me your photos if you make it!

Happy week end to you all!!!


Mad About Pink

Tuesday, August 24, 2010

Mad about Pink has been featured!

What a nice surprise when I opened my store this morning.
Look at what I saw on Dawanda...

on the featured section?


one of my purse holders!!! Thanks guys! It's nice to be appreciated and it keeps me so motivated to create more and better!


Mad About Pink

Thursday, August 19, 2010

Knit and Pink - "All be to galore" shared her favoutite tutorials with us

  Hello everybody,

today Lesley, the owner of 

All Be To Galore 

 has decided to share with us some of her favourite tutorials:


Skeleton Key Slouchie Tam - Click here for the tutorial


My pink ishbel - Click here for tutorial

 Bird in hand- Click here for tutorial

Here's her message to you to help you getting started:

While I've been knitting for 7 or 8 years now, I've really only started to get "good" within the past year. I met up with a local group of knitters and have learned so much. My advice to anyone who knits, good or bad, young or old, is to join a knitting circle! I feel like I'm part of a family in a way. I love that I'm surrounded by people who actually understand my obsession with crafting and knitting... and they don't call me a dork or a granny for it. It's inspiring to see what other people are making, how they're doing it, and what yarns they're using. Knitting gives me a sense of pride, a sense of accomplishment, and a way to control my need to multi-task. I swear I cannot sit down in front of the tv without having something else to do at the same time so knitting has become associated with relaxing for me... although it can be quite stressful at times :)

Make sure you check her blog and her creations, they are really cool!!!

Thanks Lesley for sharing them with us!

Can't wait to have you here again!
 Mad About Pink

Tuesday, August 17, 2010

Jam labels and more labels to dowload

This morning my auntie was making Mirabelle jam ( a special plum that grows in this part of France, the Lorraine region) and she inspired me with this post. Hope you like it!

If you are not sure about what label to use and how to present your jams and preserves, just keep reading!
And they all can be download!
Home-made jams or chutneys make heartfelt wedding favors that can be dressed to match any colour or theme. Simply add a swatch of fabric and pretty ribbon at the top. Bonus: label the jars with guests’ names and have them double as place cards. Label by www.greenka.etsy.com
Welcome neighbours and congratulate friends with something sweet. Grab a basket, spray paint it your favourite colour, then pack with savoury home-made spreads and jams in a variety of colours. A fresh, inspired gift the recipient is sure to love.

Don’t forget a job well done – use this calendar label to commemorate your canning date, and keep the pantry organized. Alternatively, give it in recognition of a special occasion – such as births, weddings, anniversaries and more – and the calendars add a fun way to mark the date.

Nothing conjures up the bounty of the earth like the feeling of a fall harvest. These colorful leaf-inspired labels are the perfect topper or gift tag for your canned fruits, and pair great with yarn and felt accents in matching hues. Label by www.notepourri.etsy.com.
 Dress up traditional jars for the holidays with these bold, modern labels for a fancy touch. Use contrasting ribbons to accent the jars, and disperse individually or in colorful sets. The center is left blank to include a handwritten or typed seasons greeting of your own. Label by www.notepourri.etsy.com

This retro-patterned label is complete with cursive “homemade,” reinforcing the love and effort that went into the treats. Simply drop in the name of your recipe, and you’ve got a cool gift for recipients from any era. Label by www.bohtieque.etsy.com.
 All and more via Sweet Preservation

Thursday, August 12, 2010

Great opportunity for French glassware lovers: I've been shopping for you at La Rochere!

Bonjour mes amis!
Driving around France I had to stop at the oldest glassware factory in France; yes, I'm talking about La Rochere, established in 1475!
I've been buying some glassware and tableware for my house and I decided to get some items for you too, straight from the factory hence the incredible price.
La Rochere is  the oldest manufacturer of glass products in France.

These design glasses and carafes are made from pressed glass, a process which uses a mould which enables the designs to appear in relief on the outside of the glass. 

They are perfect to give a country and chic style to your home or dinner party. 
And they are dishwasher and microwave safe!
  Here are the items I've bought for you:
Wine glass Petit Palais (set of 6)
Abeille large plate (set of 6)
Abeille small plate (set of 6)
Candle stick holder (1)
Carafe Petit Palais (1)
Versailles Wine or Water Glass (set of 6)
Versailles pasta plates (set of 6)
Versailles tumblers ( set of 6)
Versaille Carafe (1)
Check the tab Shop.
For a limited time only.
If you need a special collection, please let me know, I'll be in France for few weeks or I can get them for you, I'll ask for a quote and get back to you the next day! 

The transport costs are indicative, if you buy more listing, I'll refund you the difference, please let me know If you wish to have insurance and I'll find out for you at the post office. If you have an agreement with a courier, please let me know and don't pay the transport on Paypal. You pay what I pay!

 I hope all of you that can't come to France will enjoy it. It's a little treat for your home and a  unique Christmas present.

Up to 50% Off Home and Fashion Summer Sale                                          

Saturday, August 7, 2010

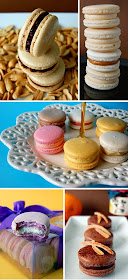
France here I come and for you...Macarons recipe

I know, I should be packing my bags to leave but I couldn't resist to post about something I love  from France... They are an eye and mouth candy to me.... what are they? Without any doubts I'm talking about macarons.

Here's a simple recipe and some cute photos to make you want to eat them.
And finally I'm off....have a good Holiday!

Basic Macaron Cookie

Steps adapted from A La Cuisine.
Ingredients
225 grams icing sugar
125 grams ground almonds
110 grams egg whites (about 4), aged overnight at room temperature
30 grams granulated sugar
Pinch of salt
Procedure
1. On three pieces of parchment, use a pencil to draw 1-inch (2.5 cm) circles about 2 inches apart. Flip each sheet over and place each sheet on a baking sheet. [Note: You only have to draw circles on the parchment paper if you want absolutely even-sized macarons. If you're skilled with piping and don't mind eyeballing the amount of batter per cookie, skip this step.]
2. Push almond flour through a tamis or sieve, and sift icing sugar. Mix the almonds and icing sugar in a bowl and set aside. If the mixture is not dry, spread on a baking sheet, and heat in oven at the lowest setting until dry.
3. In a large clean, dry bowl whip egg whites with salt on medium speed until foamy. Increase the speed to high and gradually add granulated sugar. Continue to whip to stiff peaks—the whites should be firm and shiny.
4. With a flexible spatula, gently fold in icing sugar mixture into egg whites until completely incorporated. The mixture should be shiny and 'flow like magma.' When small peaks dissolve to a flat surface, stop mixing.
4. Fit a piping bag with a 3/8-inch (1 cm) round tip. Pipe the batter onto the baking sheets, in the previously drawn circles. Tap the underside of the baking sheet to remove air bubbles. Let dry at room temperature for 1 or 2 hours to allow skins to form.
5. Bake, in a 160C/325F oven for 10 to 11 minutes. Use a wooden spoon to keep the oven door slightly ajar, and rotate the baking sheet after 5 minutes for even baking.
6. Remove macarons from oven and transfer parchment to a cooling rack. When cool, slide a metal offset spatula or pairing knife underneath the macaron to remove from parchment.
7. Pair macarons of similar size, and pipe about 1/2 tsp of the filling onto one of the macarons. Sandwich macarons, and refrigerate to allow flavors to blend together. Bring back to room temperature before serving.

Bittersweet Chocolate Cream Ganache

- makes about 2 cups (550 grams) -
Ingredients
8 ounces (230 grams) bittersweet chocolate, preferably Valrhona Guanaja, finely chopped
1 cup (250 grams) heavy cream
4 tablespoons (2 ounces; 60 grams) unsalted butter, at room temperature
Procedure
1. Place the chocolate in a bowl that's large enough to hold the ingredients and keep it close at hand. Bring the cream to a full boil in a heavy-bottomed saucepan. While the cream is coming to the boil, work the butter with a rubber spatula until it is very soft and creamy. Keep the butter aside for the moment.
1. While the cream is at the boil, remove the pan from the heat and, working with the rubber spatula, gently stir the cream into the chocolate. Start stirring in the center of the mixture and work your way out in widening concentric circles. Continue to stir—without creating bubbles—until the chocolate is completely melted and the mixture is smooth. Leave the bowl on the counter for a minute or two to cool the mixture down a little before adding the butter.
3. Add the butter to the mixture in two additions, mixing with the spatula from the center of the mixture out in widening concentric circles. When the butter is fully incorporated, the ganache should be smooth and glossy. depending on what you're making with the ganache, you can use it now, leave it on the counter to set to a spreadable or pipeable consistency (a process that could take over an hour, depending on your room's temperature) or chill it in the refrigerator, stirring now and then. (If the ganache chills too much and becomes too firm, you can give it a very quick zap in the microwave to bring it back to the desired consistency, or just let it stand at room temperature.)

(photos from Mad Baker, La duree, Etsy and random on the net)

Up to 50% Off Home and Fashion Summer Sale

Friday, August 6, 2010

Have a good holiday!!!

I'll be back on the 22nd of August so I wish you all a great holiday.
I hope to have access to my emails but I'll doubt. In any case I can't wait to read your comments at my return so keep me updated!
.....France ...here I come!


Up to 50% Off Home and Fashion Summer Sale

Wednesday, August 4, 2010

Printable thread bobbins

I couldn't resist to post about these beauties.
All via Wild Olive

 Click here to DOWNLOAD 

These Wound-Up Thread Bobbins are all set for you to print out on card stock and wind up your own embroidery floss on. The PDF has 20 bobbins, each with a different colour floss on it...Enjoy!

Up to 50% Off Home and Fashion Summer Sale

Tuesday, August 3, 2010

Just some photos to inspire me

Here's my little trip of the day on Flickr. 
I need inspiration to keep me going ... is it the same for you? and the best is found on little details...


 Have a good day!